| .github | ||
| app | ||
| docs | ||
| local_data | ||
| migrations | ||
| static | ||
| templates | ||
| tests | ||
| .dockerignore | ||
| .gitattributes | ||
| .gitignore | ||
| .pre-commit-config.yaml | ||
| .venv | ||
| CHANGELOG | ||
| cron.py | ||
| crontab.yml | ||
| Dockerfile | ||
| email_handler.py | ||
| example.env | ||
| init_app.py | ||
| job_runner.py | ||
| LICENSE | ||
| monitoring.py | ||
| new_migration.sh | ||
| oauth_tester.py | ||
| poetry.lock | ||
| pyproject.toml | ||
| README.md | ||
| server.py | ||
| shell.py | ||
| wsgi.py | ||

SimpleLogin | Privacy-First Email Forwarding and Identity Provider Service


Yet another email forwarding service?
In some way yes... However, SimpleLogin is a bit different because:
-
Fully open source: both the server and client code (browser extension, JS library) are open source so anyone can freely inspect and (hopefully) improve the code.
-
The only email forwarding solution that is self-hostable: with our detailed self-hosting instructions and most of components running as Docker container, anyone who knows
sshis able to deploy SimpleLogin on their server. -
Not just email alias: SimpleLogin is a privacy-first and developer-friendly identity provider that:
- offers privacy for users
- is simple to use for developers. SimpleLogin is a privacy-focused alternative to the "Login with Facebook/Google/Twitter" buttons.
-
Plenty of features: browser extension, custom domain, catch-all alias, OAuth libraries, etc.
-
Open roadmap at https://trello.com/b/4d6A69I4/open-roadmap: you know the exciting features we are working on.
At the heart of SimpleLogin is email alias: an alias is a normal email address but all emails sent to an alias are forwarded to your email inbox. SimpleLogin alias can also send emails: for your contact, the alias is therefore your email address. Use alias whenever you need to give out your email address to protect your online identity. More info on our website at https://simplelogin.io
Quick start
If you have Docker installed, run the following command to start SimpleLogin local server:
docker run --name sl -it --rm \
    -e RESET_DB=true \
    -e CONFIG=/code/example.env \
    -p 7777:7777 \
    simplelogin/app:3.2.2 python server.py
Then open http://localhost:7777, you should be able to login with john@wick.com/password account!
To use SimpleLogin aliases, you need to deploy it on your server with some DNS setup though, the following section will show a step-by-step guide on how to get your own email forwarder service!
General Architecture
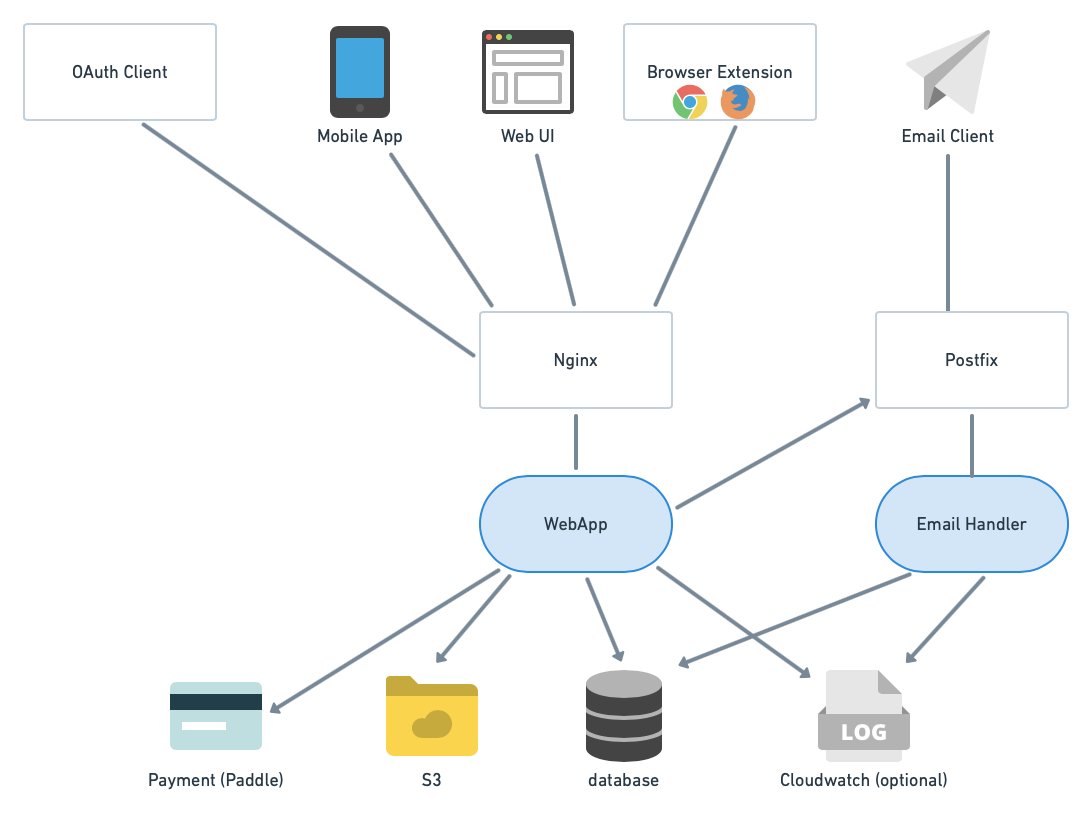
SimpleLogin backend consists of 2 main components:
-
the
webappused by several clients: web UI (the dashboard), browser extension (Chrome & Firefox for now), OAuth clients (apps that integrate "Login with SimpleLogin" button) and mobile app (work in progress). -
the
email handler: implements the email forwarding (i.e. alias receiving email) and email sending (i.e. alias sending email).
Self hosting
Prerequisites
-
a Linux server (either a VM or dedicated server). This doc shows the setup for Ubuntu 18.04 LTS but the steps could be adapted for other popular Linux distributions. As most of components run as Docker container and Docker can be a bit heavy, having at least 2 GB of RAM is recommended. The server needs to have the port 25 (email), 80, 443 (for the webapp), 22 (so you can ssh into it) open.
-
a domain that you can config the DNS. It could be a sub-domain. In the rest of the doc, let's say it's
mydomain.comfor the email andapp.mydomain.comfor SimpleLogin webapp. Please make sure to replace these values by your domain name whenever they appear in the doc. A trick we use is to download this README file on your computer and replace allmydomain.comoccurrences by your domain. -
[Optional] AWS S3, Sentry, Google/Facebook/Github developer accounts. These are necessary only if you want to activate these options.
Except for the DNS setup that is usually done on your domain registrar interface, all the below steps are to be done on your server. The commands are to run with bash (or any bash-compatible shell like zsh) being the shell. If you use other shells like fish, please make sure to adapt the commands.
Some utility packages
These packages are used to verify the setup. Install them by:
sudo apt install -y dnsutils
Create a directory to store SimpleLogin data:
mkdir sl
mkdir sl/pgp # to store PGP key
mkdir sl/db # to store database
mkdir sl/upload # to store quarantine emails
DKIM
From Wikipedia https://en.wikipedia.org/wiki/DomainKeys_Identified_Mail
DomainKeys Identified Mail (DKIM) is an email authentication method designed to detect forged sender addresses in emails (email spoofing), a technique often used in phishing and email spam.
Setting up DKIM is highly recommended to reduce the chance your emails ending up in the recipient's Spam folder.
First you need to generate a private and public key for DKIM:
openssl genrsa -out dkim.key 1024
openssl rsa -in dkim.key -pubout -out dkim.pub.key
You will need the files dkim.key and dkim.pub.key for the next steps.
For email gurus, we have chosen 1024 key length instead of 2048 for DNS simplicity as some registrars don't play well with long TXT record.
DNS
Please note that DNS changes could take up to 24 hours to propagate. In practice, it's a lot faster though (~1 minute or so in our test). In DNS setup, we usually use domain with a trailing dot (.) at the end to to force using absolute domain.
MX record
Create a MX record that points mydomain.com. to app.mydomain.com. with priority 10.
To verify if the DNS works, the following command
dig @1.1.1.1 mydomain.com mx
should return:
mydomain.com. 3600 IN MX 10 app.mydomain.com.
A record
An A record that points app.mydomain.com. to your server IP. To verify, the following command
dig @1.1.1.1 app.mydomain.com a
should return your server IP.
DKIM
Set up DKIM by adding a TXT record for dkim._domainkey.mydomain.com. with the following value:
v=DKIM1; k=rsa; p=PUBLIC_KEY
with PUBLIC_KEY being your dkim.pub.key but
- remove the
-----BEGIN PUBLIC KEY-----and-----END PUBLIC KEY----- - join all the lines on a single line.
For example, if your dkim.pub.key is
-----BEGIN PUBLIC KEY-----
ab
cd
ef
gh
-----END PUBLIC KEY-----
then the PUBLIC_KEY would be abcdefgh.
You can get the PUBLIC_KEY by running this command:
sed "s/-----BEGIN PUBLIC KEY-----/v=DKIM1; k=rsa; p=/g" dkim.pub.key | sed 's/-----END PUBLIC KEY-----//g' |tr -d '\n'
To verify, the following command
dig @1.1.1.1 dkim._domainkey.mydomain.com txt
should return the above value.
SPF
From Wikipedia https://en.wikipedia.org/wiki/Sender_Policy_Framework
Sender Policy Framework (SPF) is an email authentication method designed to detect forging sender addresses during the delivery of the email
Similar to DKIM, setting up SPF is highly recommended.
Add a TXT record for mydomain.com. with the value:
v=spf1 mx -all
What it means is only your server can send email with @mydomain.com domain.
To verify, the following command
dig @1.1.1.1 mydomain.com txt
should return the above value.
DMARC
From Wikipedia https://en.wikipedia.org/wiki/DMARC
It (DMARC) is designed to give email domain owners the ability to protect their domain from unauthorized use, commonly known as email spoofing
Setting up DMARC is also recommended.
Add a TXT record for _dmarc.mydomain.com. with the following value
v=DMARC1; p=quarantine; adkim=r; aspf=r
This is a relaxed DMARC policy. You can also use a more strict policy with v=DMARC1; p=reject; adkim=s; aspf=s value.
To verify, the following command
dig @1.1.1.1 _dmarc.mydomain.com txt
should return the set value.
For more information on DMARC, please consult https://tools.ietf.org/html/rfc7489
Docker
Now the boring DNS stuffs are done, let's do something more fun!
If you don't already have Docker installed on your server, please follow the steps on Docker CE for Ubuntu to install Docker.
Tips: if you are not using root user and you want to run Docker without the sudo prefix, add your account to docker group with the following command.
You might need to exit and ssh again to your server for this to be taken into account.
sudo usermod -a -G docker $USER
Prepare the Docker network
This Docker network will be used by the other Docker containers run in the next steps. Later, we will setup Postfix to authorize this network.
sudo docker network create -d bridge \
    --subnet=240.0.0.0/24 \
    --gateway=240.0.0.1 \
    sl-network
Postgres
This section creates a Postgres database using Docker.
If you already have a Postgres database in use, you can skip this section and just copy the database configuration (i.e. host, port, username, password, database name) to use in the next sections.
Run a Postgres Docker container as your Postgres database server. Make sure to replace myuser and mypassword with something more secret.
sudo docker run -d \
    --name sl-db \
    -e POSTGRES_PASSWORD=mypassword \
    -e POSTGRES_USER=myuser \
    -e POSTGRES_DB=simplelogin \
    -p 5432:5432 \
    -v $(pwd)/sl/db:/var/lib/postgresql/data \
    --restart always \
    --network="sl-network" \
    postgres:12.1
To test whether the database operates correctly or not, run the following command:
sudo docker exec -it sl-db psql -U myuser simplelogin
you should be logged in the postgres console. Type exit to exit postgres console.
Postfix
Install postfix and postfix-pgsql. The latter is used to connect Postfix and the Postgres database in the next steps.
sudo apt-get install -y postfix postfix-pgsql -y
Choose "Internet Site" in Postfix installation window then keep using the proposed value as System mail name in the next window.
Replace /etc/postfix/main.cf with the following content. Make sure to replace mydomain.com by your domain.
# POSTFIX config file, adapted for SimpleLogin
smtpd_banner = $myhostname ESMTP $mail_name (Ubuntu)
biff = no

# appending .domain is the MUA's job.
append_dot_mydomain = no

# Uncomment the next line to generate "delayed mail" warnings
#delay_warning_time = 4h

readme_directory = no

# See http://www.postfix.org/COMPATIBILITY_README.html -- default to 2 on
# fresh installs.
compatibility_level = 2

# TLS parameters
smtpd_tls_cert_file=/etc/ssl/certs/ssl-cert-snakeoil.pem
smtpd_tls_key_file=/etc/ssl/private/ssl-cert-snakeoil.key
smtpd_tls_session_cache_database = btree:${data_directory}/smtpd_scache
smtp_tls_session_cache_database = btree:${data_directory}/smtp_scache
smtp_tls_security_level = may
smtpd_tls_security_level = may

# See /usr/share/doc/postfix/TLS_README.gz in the postfix-doc package for
# information on enabling SSL in the smtp client.

alias_maps = hash:/etc/aliases
mynetworks = 127.0.0.0/8 [::ffff:127.0.0.0]/104 [::1]/128 240.0.0.0/24

# Set your domain here
mydestination =
myhostname = app.mydomain.com
mydomain = mydomain.com
myorigin = mydomain.com

relay_domains = pgsql:/etc/postfix/pgsql-relay-domains.cf
transport_maps = pgsql:/etc/postfix/pgsql-transport-maps.cf

# HELO restrictions
smtpd_delay_reject = yes
smtpd_helo_required = yes
smtpd_helo_restrictions =
    permit_mynetworks,
    reject_non_fqdn_helo_hostname,
    reject_invalid_helo_hostname,
    permit

# Sender restrictions:
smtpd_sender_restrictions =
    permit_mynetworks,
    reject_non_fqdn_sender,
    reject_unknown_sender_domain,
    permit

# Recipient restrictions:
smtpd_recipient_restrictions =
   reject_unauth_pipelining,
   reject_non_fqdn_recipient,
   reject_unknown_recipient_domain,
   permit_mynetworks,
   reject_unauth_destination,
   reject_rbl_client zen.spamhaus.org,
   reject_rbl_client bl.spamcop.net,
   permit
Create the /etc/postfix/pgsql-relay-domains.cf file with the following content.
Make sure that the database config is correctly set, replace mydomain.com with your domain, update 'myuser' and 'mypassword' with your postgress credentials.
# postgres config
hosts = localhost
user = myuser
password = mypassword
dbname = simplelogin

query = SELECT domain FROM custom_domain WHERE domain='%s' AND verified=true
    UNION SELECT '%s' WHERE '%s' = 'mydomain.com' LIMIT 1;
Create the /etc/postfix/pgsql-transport-maps.cf file with the following content.
Again, make sure that the database config is correctly set, replace mydomain.com with your domain, update 'myuser' and 'mypassword' with your postgress credentials.
# postgres config
hosts = localhost
user = myuser
password = mypassword
dbname = simplelogin

# forward to smtp:127.0.0.1:20381 for custom domain AND email domain
query = SELECT 'smtp:127.0.0.1:20381' FROM custom_domain WHERE domain = '%s' AND verified=true
    UNION SELECT 'smtp:127.0.0.1:20381' WHERE '%s' = 'mydomain.com' LIMIT 1;
Finally, restart Postfix
sudo systemctl restart postfix
Run SimpleLogin Docker containers
To run the server, you need a config file. Please have a look at config example for an example to create one. Some parameters are optional and are commented out by default. Some have "dummy" values, fill them up if you want to enable these features (Paddle, AWS, etc).
Let's put your config file at ~/simplelogin.env. Below is an example that you can use right away, make sure to replace mydomain.com by your domain, set FLASK_SECRET to a secret string, update 'myuser' and 'mypassword' with your postgress credentials.
Make sure to update the following variables and replace these values by yours.
# WebApp URL
URL=http://app.mydomain.com

# domain used to create alias
EMAIL_DOMAIN=mydomain.com

# transactional email is sent from this email address
SUPPORT_EMAIL=support@mydomain.com

# custom domain needs to point to these MX servers
EMAIL_SERVERS_WITH_PRIORITY=[(10, "app.mydomain.com.")]

# By default, new aliases must end with ".{random_word}". This is to avoid a person taking all "nice" aliases.
# this option doesn't make sense in self-hosted. Set this variable to disable this option.
DISABLE_ALIAS_SUFFIX=1

# If you want to use another MTA to send email, you could set the address of your MTA here
# By default, emails are sent using the the same Postfix server that receives emails
# POSTFIX_SERVER=my-postfix.com

# the DKIM private key used to compute DKIM-Signature
DKIM_PRIVATE_KEY_PATH=/dkim.key

# the DKIM public key used to setup custom domain DKIM
DKIM_PUBLIC_KEY_PATH=/dkim.pub.key

# DB Connection
DB_URI=postgresql://myuser:mypassword@sl-db:5432/simplelogin

FLASK_SECRET=put_something_secret_here

GNUPGHOME=/sl/pgp

LOCAL_FILE_UPLOAD=1
Before running the webapp, you need to prepare the database by running the migration:
sudo docker run --rm \
    --name sl-migration \
    -v $(pwd)/sl:/sl \
    -v $(pwd)/sl/upload:/code/static/upload \
    -v $(pwd)/dkim.key:/dkim.key \
    -v $(pwd)/dkim.pub.key:/dkim.pub.key \
    -v $(pwd)/simplelogin.env:/code/.env \
    --network="sl-network" \
    simplelogin/app:3.2.2 flask db upgrade
This command could take a while to download the simplelogin/app docker image.
Init data
sudo docker run --rm \
    --name sl-init \
    -v $(pwd)/sl:/sl \
    -v $(pwd)/simplelogin.env:/code/.env \
    -v $(pwd)/dkim.key:/dkim.key \
    -v $(pwd)/dkim.pub.key:/dkim.pub.key \
    --network="sl-network" \
    simplelogin/app:3.2.2 python init_app.py
Now, it's time to run the webapp container!
sudo docker run -d \
    --name sl-app \
    -v $(pwd)/sl:/sl \
    -v $(pwd)/sl/upload:/code/static/upload \
    -v $(pwd)/simplelogin.env:/code/.env \
    -v $(pwd)/dkim.key:/dkim.key \
    -v $(pwd)/dkim.pub.key:/dkim.pub.key \
    -p 7777:7777 \
    --restart always \
    --network="sl-network" \
    simplelogin/app:3.2.2
Next run the email handler
sudo docker run -d \
    --name sl-email \
    -v $(pwd)/sl:/sl \
    -v $(pwd)/sl/upload:/code/static/upload \
    -v $(pwd)/simplelogin.env:/code/.env \
    -v $(pwd)/dkim.key:/dkim.key \
    -v $(pwd)/dkim.pub.key:/dkim.pub.key \
    -p 20381:20381 \
    --restart always \
    --network="sl-network" \
    simplelogin/app:3.2.2 python email_handler.py
Nginx
Install Nginx and make sure to replace mydomain.com by your domain
sudo apt-get install -y nginx
Then, create /etc/nginx/sites-enabled/simplelogin with the following lines:
server {
    server_name  app.mydomain.com;

    location / {
        proxy_pass http://localhost:7777;
    }
}
Reload Nginx with the command below
sudo systemctl reload nginx
At this step, you should also setup the SSL for Nginx. Certbot can be a good option if you want a free SSL certificate.
Enjoy!
If all of the above steps are successful, open http://app.mydomain.com/ and create your first account!
By default, new accounts are not premium so don't have unlimited alias. To make your account premium, please go to the database, table "users" and set "lifetime" column to "1" or "TRUE".
You don't have to pay anything to SimpleLogin to use all its features. You could make a donation to SimpleLogin on our Patreon page at https://www.patreon.com/simplelogin if you wish though.
Misc
The above self-hosting instructions correspond to a freshly Ubuntu server and doesn't cover all possible server configuration. Below are pointers to different topics:
- Enable SSL
- UFW - uncomplicated firewall
- SES - Amazon Simple Email Service
- Upgrade existing SimpleLogin installation
- Enforce SPF
- Postfix TLS
Contributing
All work on SimpleLogin happens directly on GitHub.
Run code locally
The project uses
- Python 3.7+ and poetry to manage dependencies
- Node v10 for front-end.
First, install all dependencies by running the following command.
Feel free to use virtualenv or similar tools to isolate development environment.
poetry install
You also need to install gpg, on Mac it can be done with:
brew install gnupg
Then make sure all tests pass
pytest
Install npm packages
cd static && npm install
To run the code locally, please create a local setting file based on example.env:
cp example.env .env
Make sure to uncomment the RESET_DB=true to create the database locally.
Feel free to custom your .env file, it would be your default setting when developing locally. This file is ignored by git.
You don't need all the parameters, for example, if you don't update images to s3, then
BUCKET, AWS_ACCESS_KEY_ID can be empty or if you don't use login with Github locally, GITHUB_CLIENT_ID doesn't have to be filled. The example.env file contains minimal requirement so that if you run:
python3 server.py
then open http://localhost:7777, you should be able to login with the following account
john@wick.com / password
Database migration
The database migration is handled by alembic
Whenever the model changes, a new migration has to be created.
If you have Docker installed, you can create the migration by the following script:
sh new_migration.sh
Make sure to review the migration script before committing it. Sometimes (very rarely though), the automatically generated script can be incorrect.
We cannot use the local database to generate migration script as the local database doesn't use migration.
It is created via db.create_all() (cf fake_data() method). This is convenient for development and
unit tests as we don't have to wait for the migration.
Code structure
The repo consists of the three following entry points:
- wsgi.py and server.py: the webapp.
- email_handler.py: the email handler.
- cron.py: the cronjob.
Here are the small sum-ups of the directory structures and their roles:
- app/: main Flask app. It is structured into different packages representing different features like oauth, api, dashboard, etc.
- local_data/: contains files to facilitate the local development. They are replaced during the deployment.
- migrations/: generated by flask-migrate. Edit these files will be only edited when you spot (very rare) errors on the database migration files.
- static/: files available at
/staticurl. - templates/: contains both html and email templates.
- tests/: tests. We don't really distinguish unit, functional or integration test. A test is simply here to make sure a feature works correctly.
The code is formatted using https://github.com/psf/black, to format the code, simply run
black .
Test sending email
swaks is used for sending test emails to the email_handler.
mailcatcher is used to receive forwarded emails.
There are several steps to set up the email handler
- run mailcatcher
mailcatcher
- Make sure to set the following variables in the
.envfile
NOT_SEND_EMAIL=true
POSTFIX_SERVER=localhost
POSTFIX_PORT=1025
- Run email_handler
python email_handler.py
- Send a test email
swaks --to e1@d1.localhost --from hey@google.com --server 127.0.0.1:20381
Now open http://localhost:1080/, you should see the test email.
❤️ Contributors
Thanks go to these wonderful people:
 Dung Nguyen Van |
 Giuseppe Federico |
 Ninh Dinh |
 Tung Nguyen V. N. |
 Son Nguyen Kim |
 Raymond Nook |
 Sibren Vasse |