4.6 KiB
Thanks for taking the time to contribute! 🎉👍
The project uses Flask and requires Python3.7+.
Quick start
If you have Docker installed, run the following command to start SimpleLogin local server:
docker run --name sl -it --rm \
    -e RESET_DB=true \
    -e CONFIG=/code/example.env \
    -p 7777:7777 \
    simplelogin/app:3.4.0 python server.py
Then open http://localhost:7777, you should be able to login with john@wick.com/password account.
General Architecture
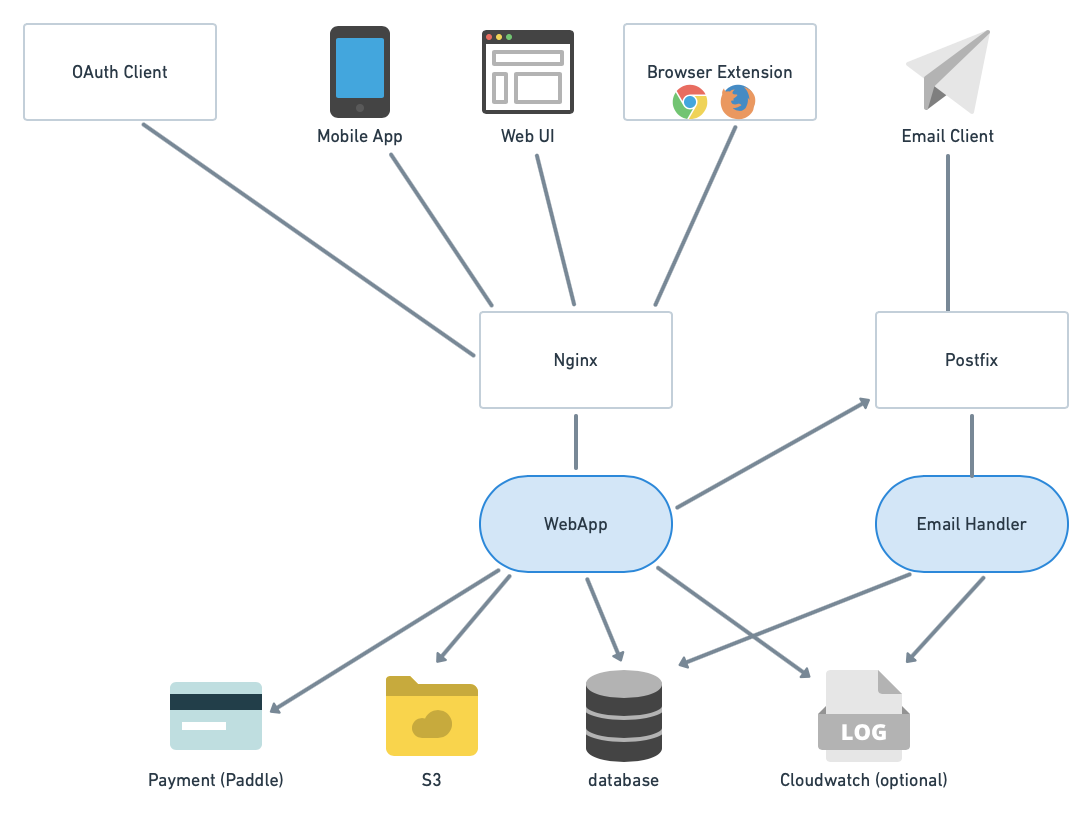
SimpleLogin backend consists of 2 main components:
-
the
webappused by several clients: web UI (the dashboard), browser extension (Chrome & Firefox for now), OAuth clients (apps that integrate "Login with SimpleLogin" button) and mobile app (work in progress). -
the
email handler: implements the email forwarding (i.e. alias receiving email) and email sending (i.e. alias sending email).
Run code locally
The project uses
- Python 3.7+ and poetry to manage dependencies
- Node v10 for front-end.
First, install all dependencies by running the following command.
Feel free to use virtualenv or similar tools to isolate development environment.
poetry install
On Mac, sometimes you might need to install some other packages like
brew install pkg-config libffi openssl postgresql
You also need to install gpg, on Mac it can be done with:
brew install gnupg
Then make sure all tests pass
pytest
Install npm packages
cd static && npm install
To run the code locally, please create a local setting file based on example.env:
cp example.env .env
To run the server:
python3 server.py
then open http://localhost:7777, you should be able to login with the following account
john@wick.com / password
You might need to change the .env file for developing certain features. This file is ignored by git.
Database migration
The database migration is handled by alembic
Whenever the model changes, a new migration has to be created.
If you have Docker installed, you can create the migration by the following script:
sh new_migration.sh
Make sure to review the migration script before committing it. Sometimes (very rarely though), the automatically generated script can be incorrect.
We cannot use the local database to generate migration script as the local database doesn't use migration.
It is created via db.create_all() (cf fake_data() method). This is convenient for development and
unit tests as we don't have to wait for the migration.
Code structure
The repo consists of the three following entry points:
- wsgi.py and server.py: the webapp.
- email_handler.py: the email handler.
- cron.py: the cronjob.
Here are the small sum-ups of the directory structures and their roles:
- app/: main Flask app. It is structured into different packages representing different features like oauth, api, dashboard, etc.
- local_data/: contains files to facilitate the local development. They are replaced during the deployment.
- migrations/: generated by flask-migrate. Edit these files will be only edited when you spot (very rare) errors on the database migration files.
- static/: files available at
/staticurl. - templates/: contains both html and email templates.
- tests/: tests. We don't really distinguish unit, functional or integration test. A test is simply here to make sure a feature works correctly.
Pull request
Please contact us if you want to work on a new feature.
The code is formatted using https://github.com/psf/black, to format the code, simply run
poetry run black .
The code is also checked with flake8, make sure to run flake8 before creating the pull request by
poetry run flake8
Test sending email
swaks is used for sending test emails to the email_handler.
mailcatcher or MailHog can be used as a MTA to receive emails.
Here's how set up the email handler:
- run mailcatcher or MailHog
mailcatcher
- Make sure to set the following variables in the
.envfile
# comment out this variable
# NOT_SEND_EMAIL=true

# So the emails will be sent to mailcatcher/MailHog
POSTFIX_SERVER=localhost
POSTFIX_PORT=1025
- Run email_handler
python email_handler.py
- Send a test email
swaks --to e1@sl.local --from hey@google.com --server 127.0.0.1:20381
Now open http://localhost:1080/ (or http://localhost:1080/ for MailHog), you should see the forwarded email.